Subnautica 2 Creature Enamel Guide: Location And Uses
Creature Enamel in Subnautica 2 is found on black mineral deposits with white bone like spikes around the Alien Ruins biome. It is used to craft Enameled Glass, which becomes important once the game starts pushing into later alien tech routes, Bioscanner crafting, and stronger upgrades.
For more Subnautica 2 material routes, tool unlocks, and progression help, use the main Subnautica 2 guide hub.
Jump To
How To Get Creature Enamel In Subnautica 2
To get Creature Enamel in Subnautica 2, travel to the Alien Ruins biome, find black mineral deposits with white tooth like spikes, then break those deposits with the Sonic Resonator.
Creature Enamel is not an early hand pickup like Titanium or Quartz. It appears later, after progression moves past the Tadpole Pens and toward the Alien Ruins research base. This is also around the point where Enameled Glass starts showing up as a crafting need, so Creature Enamel can feel like a sudden wall if the correct deposit has not been spotted yet.
| Material | Where To Find It | Tool Needed | Main Use |
|---|---|---|---|
| Creature Enamel | Biome around the Alien Ruins | Sonic Resonator | Enameled Glass |
The key is the visual clue. Creature Enamel sticks out of black rock deposits like pale bone, teeth, or white spikes. Once that shape clicks, the material becomes much easier to identify in the alien biome.
Creature Enamel Location In Subnautica 2
Creature Enamel is found around the Alien Ruins research base, with a strong farming spot on a rock pillar roughly 200 meters southeast from the Alien Ruins base.
The broader route places the Alien Ruins far from the Lifepod, around the deeper eastern progression path. One player described the route as heading about 1,318 meters from the Lifepod, facing between 75 degrees and east on the compass, then going about 110 meters down to find an Alterra base or Alien Ruins marker. From there, Creature Enamel is found farther south and a bit deeper near a large rock formation with Needlers nearby.
| Location Clue | What To Look For |
|---|---|
| Alien Ruins | Main landmark for the biome where Creature Enamel appears. |
| Rock pillar southeast of the base | A strong Creature Enamel farming spot. |
| Large rock formation south of the ruins | Another route clue for finding the mineral deposits. |
| Needlers nearby | A danger clue that the area may be correct. |
| Black deposits with white spikes | The actual Creature Enamel source. |
If the Alien Ruins marker is active, use that as the route anchor. If it is not active yet, the compass and distance clues can still help, but the search is much easier once the game has pushed that objective route forward.
How To Reach The Alien Ruins Creature Enamel Area
The Creature Enamel route starts by moving far from the Lifepod toward the Alien Ruins, then searching the area southeast or south of the research base for black tooth covered deposits.
This is not a starter material route like Silver or Lead. It comes after deeper exploration, and the area has more dangerous wildlife than early resource caves. The trip should be treated like a real expedition, not a quick snack run outside the Lifepod.
| Route Step | What To Do |
|---|---|
| 1 | Progress toward the Alien Ruins or follow the Alien Ruins marker if available. |
| 2 | Travel far from the Lifepod along the eastern route. |
| 3 | Reach the Alien Ruins research base area. |
| 4 | Search about 200 meters southeast of the base or south and deeper near the large rock formation. |
| 5 | Look for black deposits with white bone like spikes. |
| 6 | Use the Sonic Resonator to break the deposits and collect Creature Enamel. |
If later alien material routes are starting to open, the Subnautica 2 Conduit Crystal guide is another useful page because it covers a nearby advanced resource tied to the same general progression stage.
If this is the first push beyond the Tadpole Pens, the Subnautica 2 Tadpole Pens keycode guide can help with the earlier locked door route before the Alien Ruins stretch opens up.
How To Mine Creature Enamel
Creature Enamel deposits are mined with the Sonic Resonator, just like larger deposits for materials such as gold, titanium, lead, and quartz.
Aim the Sonic Resonator at the black mineral deposit with the white enamel spikes and fire until it breaks. The shape of the deposit can make the blast feel inconsistent from certain angles, so reposition and try again if it does not break on the first shot.
This is not a hand pickup. The white spikes are the clue, but the resource comes from breaking the deposit. If the material is visible but nothing is being collected, the Sonic Resonator step is probably missing.
| Mining Step | What To Do |
|---|---|
| Find the deposit | Look for white spikes sticking out of black rock. |
| Equip Sonic Resonator | The deposit needs the regular Sonic Resonator to break. |
| Aim at the deposit body | Do not only aim at the thin white spikes. |
| Reposition if needed | The shape can make a bad angle fail. |
| Collect the drops | Each set can drop a few pieces of Creature Enamel. |
If the Sonic Resonator route is still blocked, the Subnautica 2 Lead guide helps with one of the key early materials connected to that tool progression.
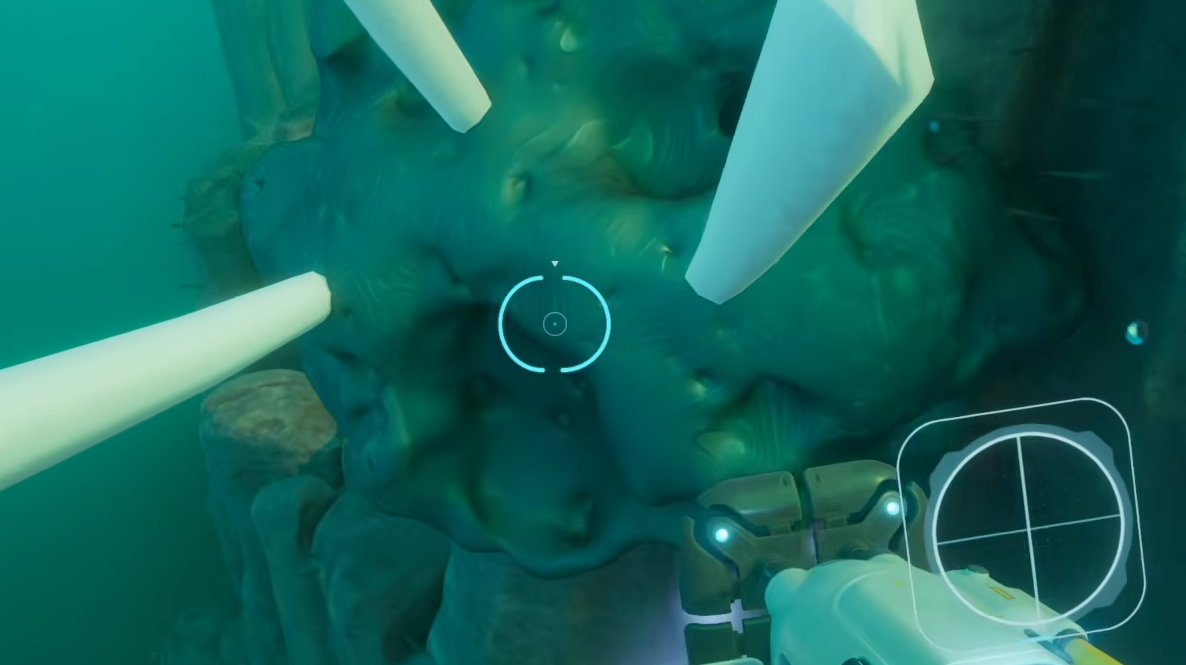
What Creature Enamel Looks Like
Creature Enamel looks like white sticks, teeth, or bone spikes protruding from black mineral deposits.
That visual is the whole trick. The material does not look like a clean crystal, a normal ore node, or a loose resource sitting on the seabed. It looks more like a dark rock lump with pale organic spikes coming out of it.
| Visual Clue | What It Means |
|---|---|
| Black mineral lump | The base deposit that needs to be broken. |
| White protruding sticks | The Creature Enamel clue. |
| Bone or tooth like shape | Helps separate it from normal rock resources. |
| Near Needlers | The nearby enemy presence can confirm the general area. |
Once the visual is recognized, it becomes much easier to spot while moving through the Alien Ruins biome. Before that, it is very easy to swim past it and assume the material is somewhere else.
Watch Out For Needlers Near Creature Enamel
The Creature Enamel area is patrolled by Needlers, which can fire spikes if they notice the player.
This is one of the reasons the route can feel rough the first time through. The material itself is not complicated, but the area is hostile enough that stopping to line up Sonic Resonator shots can get annoying fast.
- Approach the deposit from a safe angle if Needlers are nearby.
- Do not hover in one place too long while aiming the Sonic Resonator.
- Break the deposit, grab the enamel, and move away before more enemies close in.
- Use the Alien Ruins base or safer terrain as a route anchor if oxygen or safety gets tight.
The goal is a quick mining pass, not a scenic tour through spike fish territory. The ocean already has enough opinions.
What Creature Enamel Is Used For
Creature Enamel is used to craft Enameled Glass in Subnautica 2.
Enameled Glass starts appearing once progression reaches more advanced crafting. The material becomes especially important around the Alien Ruins stage because the research base Fabricator introduces new crafting options and later upgrades start asking for stronger components.
| Creature Enamel Use | Why It Matters |
|---|---|
| Enameled Glass | Needed for stronger late progression crafting. |
| Bioscanner crafting chain | The Bioscanner needs Enameled Glass and Conduit Crystal. |
| Alien Ruins progression | Creature Enamel appears around the same stage as other advanced alien area materials. |
If the immediate goal is the Bioscanner, the Conduit Crystal location guide pairs well with this route because the Bioscanner also needs Conduit Crystal.
My Route Tip For Creature Enamel
From my experience, the best way to search for Creature Enamel is to stop looking for a normal resource node and instead scan the rocks for white teeth.
I would use the Alien Ruins base as the main anchor, then sweep southeast first. If the Needlers are around and the terrain starts forming larger dark rock pillars, that is the right kind of area. The deposit can blend into the rock until the white enamel spikes catch the eye, so moving slowly and checking the sides of rock formations works better than swimming in a straight line.
I also would not leave after mining one deposit if inventory space is open. Each deposit can drop multiple pieces, and Enameled Glass is useful enough that extra Creature Enamel saves another long swim back into Needler territory.
Why You Cannot Find Creature Enamel
If Creature Enamel is not showing up, the search is probably too close to the Lifepod, missing the Alien Ruins area, or looking for the wrong type of deposit.
| Problem | Likely Cause | Fix |
|---|---|---|
| No Creature Enamel near early areas | It is a later Alien Ruins resource. | Progress toward the Alien Ruins and search the biome around the research base. |
| Found black rocks but no drops | The deposit has not been broken correctly. | Use the Sonic Resonator and aim at the main body of the deposit. |
| Sonic Resonator does not break it | The angle may be bad because of the deposit shape. | Reposition and fire again from a clearer angle. |
| Needlers keep interrupting mining | The correct area is hostile. | Mine quickly, move between shots, and avoid hovering in open water. |
| Need Enameled Glass but missing materials | Creature Enamel is only one part of the chain. | Gather Creature Enamel from the deposits, then check the other recipe requirements. |
Creature Enamel is not hard once the visual makes sense. It is a black mineral deposit with white tooth like spikes, found around the Alien Ruins and broken with the Sonic Resonator. The hard part is not the mechanic. The hard part is realizing the weird bone rock is the resource.
Subnautica 2 Creature Enamel Location Video
The video below shows the Creature Enamel location route visually, which helps because the resource can blend into the dark rock formations around the Alien Ruins.
Final Blurb
Creature Enamel in Subnautica 2 is found around the Alien Ruins biome, especially on black deposits with white bone like spikes near rock formations southeast or south of the Alien Ruins research base. Use the Sonic Resonator to break the deposit and collect the enamel.
The material is mainly used for Enameled Glass, which becomes important for advanced crafting such as the Bioscanner chain. Watch for Needlers, search the rock pillars carefully, and do not ignore the white tooth covered deposits. Subnautica 2 does not label them politely, because apparently even rocks need to be dramatic now.