Star Wars Zero Company Resonance Explained
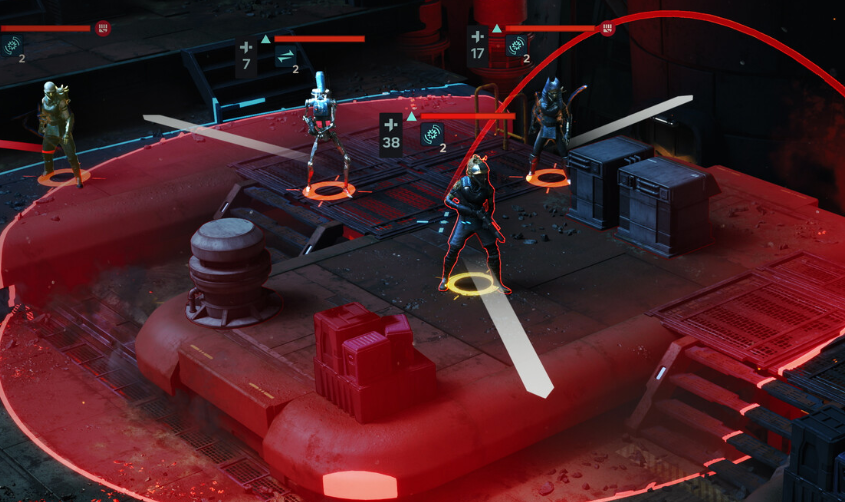
Resonance is the Infinite Coil's signature combat mechanic in Star Wars Zero Company. When an Infected Coil enemy is defeated, its Resonance transfers to the nearest surviving Infected unit, and reaching 3 Resonance causes that enemy to Surge into a much more dangerous version of itself. The important part isn't just watching the counter, but rather realizing that your kill order and enemy positioning influence which unit receives those stacks.
Jump To Section:
What Is Resonance?
How Resonance Transfers
What Happens at 3 Resonance?
Best Kill Order
How to Control Resonance
Enemies That Generate Extra Resonance
How to Handle a Surged Enemy
What Is Resonance in Star Wars Zero Company?
The easiest way to think about Resonance is as a transferable danger meter attached to enemies infected by the Infinite Coil's Shadow Plague.
An Infected unit can accumulate Resonance during combat. Once that unit reaches 3 stacks, the plague Surges and empowers it. More importantly, killing an infected enemy doesn't necessarily remove the problem from the battlefield because its Resonance is transferred to the nearest other Infected unit.
That's why Infinite Coil encounters can suddenly feel like they're getting harder even though you're successfully killing enemies. Removing one target may simultaneously push another closer to a Surge.
Against most factions, killing the easiest target first is usually a safe way to reduce the number of enemy actions. Against the Coil, I look at two things before taking that kill: how much Resonance the target already has and who is standing closest to it.
How Resonance Transfers Between Coil Enemies
The key word in the Resonance description is nearest. When an enemy carrying Resonance is defeated, those stacks go to the closest surviving Infected unit rather than being assigned randomly across the battlefield.
That makes Resonance partially predictable.
Imagine three Coil enemies standing in a rough line. The enemy in the middle is nearly dead, but the Brute beside it is already approaching a dangerous Resonance threshold. Finishing the weak target without checking proximity can push that Brute directly toward a Surge. If another less threatening enemy is closer instead, the same kill may produce a much safer result.
You're therefore making two decisions whenever you finish an Infected enemy:
Which enemy am I removing, and which surviving enemy am I potentially empowering?
That second question is what separates Coil fights from normal cleanup encounters.
What Happens When Resonance Reaches 3 Stacks?
At 3 Resonance, the infected unit Surges. The game's own description says the plague grants the enemy newfound vigor, strength, and powers, and in practice that can mean a much more threatening unit than the one you were fighting a moment earlier.
A Surge can restore health, strengthen the enemy, and enable additional effects or abilities depending on the unit involved. That includes mechanics such as Retaliation on certain enemies, while other Coil units can gain their own plague-enhanced behavior.
This is why allowing the wrong enemy to reach 3 stacks can completely change your next turn. An enemy you had nearly finished may recover enough health that the AP you've already invested into damaging it effectively has to be spent again.
It's also why I don't treat 1 Resonance, 2 Resonance, and 3 Resonance as equivalent. A unit sitting at 2 is one bad transfer away from becoming a completely different tactical problem.
Don't Automatically Kill the Lowest-Health Enemy First
The normal turn-based strategy instinct is to remove enemy actions as quickly as possible. If one opponent has 5 HP remaining and another has 50, taking the guaranteed kill usually makes sense.
Resonance complicates that rule.
If killing the 5 HP target is going to Surge the most dangerous Coil unit on the map, finishing it immediately can leave you in a worse position than you started. You removed one weak action but created one heavily empowered action in exchange.
Instead, check the Resonance counters before committing to each kill. In particular, I would pay attention to units sitting at 2 stacks and anything with an especially dangerous ability set if it becomes empowered.
You don't need to stop killing enemies. The goal is to sequence the kills so the Resonance ends up somewhere you can immediately deal with.
You Can Manipulate Where Resonance Goes
This is the part of the mechanic that gives you more control than it initially appears.
Because Resonance transfers to the nearest Infected unit, movement and forced movement can change the next recipient. If you have a way to reposition enemies before scoring the kill, you may be able to move a dangerous recipient farther away or leave a weaker target as the closest infected unit.
Force abilities are particularly interesting here because Push and Pull can change the geometry of the battlefield without requiring the Coil to cooperate. Knockback and other displacement effects can accomplish something similar when the map allows it.
You don't need to engineer every kill like a puzzle, but it's worth looking for these opportunities when an enemy is already sitting at 2 Resonance.
This also makes squad-wide resources more important. My Star Wars Zero Company Advantage guide explains how the shared Advantage pool works and why saving it for the right Special Action can be more useful than immediately spending it on extra damage.
Some Coil Upgrades Generate Resonance Without a Death
Later in the campaign, the death-transfer mechanic isn't necessarily the only way you need to worry about Resonance appearing.
Infinite Coil upgrades can add additional ways for specific enemies to generate stacks. Adaptive Response, for example, causes an Enforcer to gain 1 Resonance the first time its health falls below 50%. Resonating Strike allows Striker melee attacks to grant the Striker 1 Resonance, while Divine Pain can give Brutes Resonance when they're damaged.
There is also Resonant Healing, which causes a Captain's healing to grant Resonance to the target, and a Surge Aura upgrade can make the Captain's Resonate ability trigger an immediate Surge.
This becomes important when you're deciding which Coil improvements to prevent during Crisis content. A straightforward damage increase is obvious, but I generally worry more about upgrades that accelerate Resonance because they're interacting with the faction's entire snowball mechanic rather than making one attack slightly stronger.
Once those upgrades begin appearing, you should stop assuming that a target at 1 stack is guaranteed to remain at 1 until another Coil enemy dies.
What to Do When an Enemy Surges
If an important Coil enemy reaches 3 Resonance and Surges, reassess the board before continuing whatever plan you had at the start of the turn.
I usually treat a dangerous Surged enemy as a new priority target because the health recovery and additional plague effects can quickly make leaving it active more expensive than finishing another normal enemy.
That doesn't mean every Surge requires blindly dumping the entire squad into the target. Check what actually changed first. If the enemy gained Retaliation, for example, repeatedly feeding it low-value attacks may be exactly what you don't want to do.
This is where having a squad that can solve problems in several different ways is much more useful than four Operators that only deal damage. Control, guaranteed critical hits, Defense reduction, forced movement, healing, and high-burst Special Actions all give you different answers when Resonance suddenly changes the encounter.
My Star Wars Zero Company best team and squad composition guide goes deeper into building a squad around those different jobs instead of simply stacking your four highest-damage Operators.
A Better Way to Think About a Coil Turn
Instead of looking at a Coil encounter and asking, “Who can I kill this turn?”, I think a better sequence is:
First, identify every enemy at 2 Resonance. Those are your potential Surge problems.
Second, look at the enemy you're planning to kill and determine which Infected unit is closest to it.
Third, ask whether you can finish the recipient as part of the same turn if that kill causes a Surge.
If the answer is no, see whether another target or a repositioning ability gives you a cleaner sequence.
This approach is especially effective when you have enough AP and Advantage to plan several attacks together. Rather than treating each Operator's turn independently, you're setting up a chain where the Resonance transfer is already accounted for before the first enemy dies.
That's also one of the broader combat habits I recommend in my Star Wars Zero Company tips and tricks guide: think about the squad's entire round before spending the first few AP.
Resonance vs. Surge Explained
Resonance and Surge are related, but they aren't the same status.
Resonance is the stacking mechanic. It builds toward 3 and can transfer between Infected Coil units when one is defeated.
Surge is what happens when that threshold is reached. The Shadow Plague empowers the enemy, giving it increased combat potential and potentially new plague-related abilities.
So if you're looking at an enemy with 2 Resonance, it hasn't Surged yet. It's sitting one step away from doing so, which is often the most important moment to reconsider your kill order.
Can Trick Help Against Resonance?
Trick is useful against the Coil because he gives you several ways to finish or disrupt targets without being locked into one type of attack. Rocket Strike can punish clustered enemies, while adding another Specialization later gives him even more ways to set up or finish priority targets.
His flexibility is valuable when Resonance changes which target needs to die halfway through a turn. My Star Wars Zero Company best Trick build covers how I develop him across the campaign.
And if you've progressed far enough that Trick suddenly isn't available for reasons unrelated to combat, my Star Wars Zero Company how to save Trick guide explains what happens during Stillwatch and whether you can get him back.
Resonance Is Really a Kill-Order Mechanic
The biggest mistake is treating Resonance as another generic enemy buff you can ignore until the icon reaches 3.
It changes which enemy should die first, which enemy should stand closest to that kill, and whether you actually have enough damage left in the round to deal with the recipient afterward.
Watch the stacks, identify anything sitting at 2, and check the nearest Infected unit before finishing an enemy. If you do those three things, Infinite Coil encounters become much more predictable instead of feeling like enemies are randomly healing and powering themselves up every time you start winning.