Paralives Build Mode Guide
Build Mode in Paralives gives players a lot of freedom right away, with adjustable walls, platforms, roofs, stairs, terrain tools, paint options, and furniture customization. The best way to build a good house is not to open every menu at once, but to plan the lot, shape the shell, fix the floor plan, then decorate once the structure actually works.
For more Paralives guides, check the main Paralives hub.
If the goal is moving a household into a better lot instead of building from scratch, the Paralives how to move houses guide covers buying new lots, selling old homes, and splitting households.
Jump To
How Build Mode Works In Paralives
Build Mode in Paralives is opened from a lot by clicking the house icon in the bottom left corner or pressing TAB, then using the Build Mode, Buy Mode, Room Tool, Furnishing, and Terrain Tools menus to shape the house and lot.
The first thing to understand is that Build Mode is not just a furniture shop. It is the full house creation system. The tools cover walls, paint, doors, windows, stairs, roofs, chimneys, architectural details, fences, objects, plants, terrain sculpting, and terrain painting. Most of those tools also have customization options for color, texture, size, shape, height, or placement.
The amount of freedom is the big selling point, but it also means the menu can feel busy at first. The better approach is to ignore half the decorative tools until the house has a real shape. A good Paralives build starts with the lot and floor plan. Furniture, colors, plants, and small details come later. Decorating a bad layout just makes a bad layout prettier, which is still a bad layout, now with tasteful curtains.
Best Build Order For Paralives Houses
The best build order in Paralives is lot choice, shell shape, room layout, platforms, doors and windows, stairs, roof, paint, furniture, terrain, then final details.
This order keeps the house easy to fix while it is still cheap and simple. Walls and rooms should come before paint. Doors and windows should come before detailed decorating. Roofs should come after the main shape is stable. Terrain should usually come near the end, because a great garden cannot save a house with no usable kitchen path.
| Build Step | What To Do | Why It Matters |
|---|---|---|
| 1 | Pick the lot | The view, terrain, and lot size decide what kind of house fits. |
| 2 | Build the shell | The outside shape controls roof difficulty and room flow. |
| 3 | Plan rooms | Bedrooms, bathrooms, kitchen, and living space need to work before decorating. |
| 4 | Add platforms | Raised or lowered areas add depth without needing a huge house. |
| 5 | Place doors, windows, and stairs | This fixes movement, light, access, and floor connections. |
| 6 | Finish roof and exterior | The roof works better once the main footprint is final. |
| 7 | Paint, furnish, and landscape | Style comes last once the structure already works. |
I would not spend too much time on furniture until the floor plan feels right. Move a Para through the house mentally before decorating. The kitchen should make sense. The bathroom should not be hidden behind 4 doors and a dramatic hallway. Bedrooms need space. If the flow is bad, fix the walls first.
Choosing The Right Lot Before Building
The best lot in Paralives depends on the house style, because Melino has different locations for residential neighborhoods, farms, beachside builds, and more open scenic lots.
Lot choice affects more than scenery. A farm style house needs outdoor room. A tight family home works better in a neighborhood. A modern showcase build might look better on a cleaner open lot. A beachside home should use the view instead of pretending the windows do not exist.
Empty lots are the best starting point for custom builds because nothing has to be deleted first. Melino gives enough variety that the lot can support the story of the house before the first wall is placed. There is also an empty flat world option for players who want to focus only on building without town layout getting in the way.
The practical rule is simple. Pick the lot for the lifestyle first. A cozy cottage, large family home, modern mansion, and countryside build should not all start from the same idea. The lot should already suggest the build’s purpose.
How To Build A Clean Layout
A clean Paralives layout starts with simple room blocks, short walking routes, enough bathroom access, and a house shape that will not make the roof harder than it needs to be.
The biggest beginner trap is building from the outside only. A house can look great from the front and still be awful inside. Start with the rooms the household actually needs, then shape the exterior around that. For most homes, the core is kitchen, living room, bathroom, bedroom space, and enough hallway or open area for movement.
Keep the first floor simple. A boxy layout is not automatically boring if the interior flow works. Paralives has enough tools to add interest later through platforms, wall thickness, arches, paint, molding, columns, windows, terrain, and exterior details. The structure does not need to be weird immediately.
For family homes, plan future space early. It is easier to leave room for another bedroom than to rebuild the whole house after the household grows. For starter homes, stay compact. A huge early house can eat money and make daily actions slower than they need to be.
If the build is being planned around a bigger family, the Paralives how to try for a baby guide explains the family setup side before a household suddenly needs more bedrooms.
Walls, Platforms, And Rooms
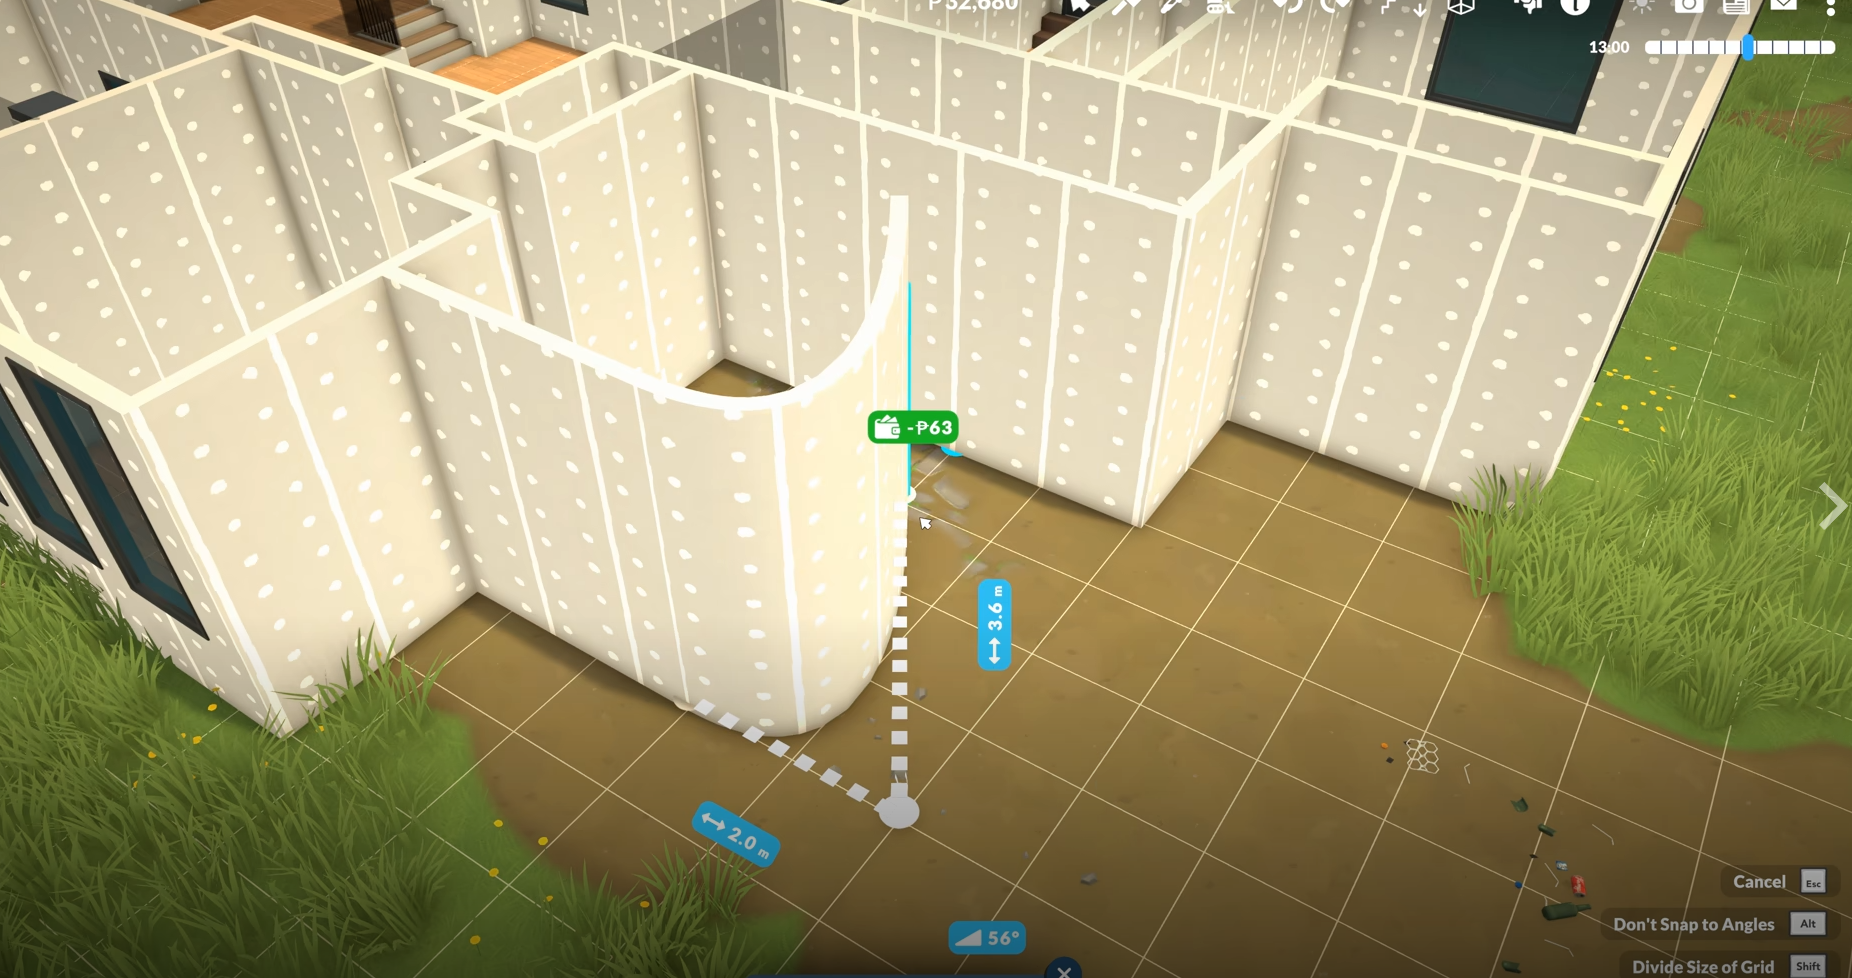
Walls are the core of Build Mode in Paralives, with standard walls, half walls, invisible walls, straight walls, curved walls, adjustable height, adjustable thickness, and platform height options for rooms.
This is where Paralives starts to feel different from a basic grid builder. Wall height and wall thickness can be adjusted, which gives builds more architectural range. A thin modern wall and a thick classical wall do not create the same feeling. Half walls can also be customized, and invisible walls are useful when a space needs room logic without a full visual barrier.
Holding Shift while dragging walls allows half grid placement, which is one of the best precision tools for cleaner layouts. It helps when a room needs a more exact shape, or when a wall placement feels just slightly off on the normal grid.
Platforms are the stronger beginner tool than they first look. Raised and lowered sections can make a house feel more layered without adding another floor. They are useful for foundations, split level living rooms, elevated kitchens, sunken lounges, entry steps, and indoor staging. A small platform change can make a simple room feel designed instead of dropped into place.
Curved walls are great for style, but they have an Early Access limitation. Doors and windows currently cannot be placed on curved walls. Use curved walls for exterior shape, decorative rooms, rounded corners, or design moments, but do not build an entire main room around them if it needs normal window and door placement.
Doors, Windows, And Stairs
Doors, windows, and stairs should be placed after the main layout is finished because they decide how the house moves, where light enters, and how floors connect.
Doors are split into categories like exterior doors, interior doors, patio doors, closet doors, and arches. The useful part is not just variety. Doors can be flipped, adjusted, and matched to the room’s style. Arches are especially strong because some can be dragged wider or adjusted in height, which makes open concept rooms feel more custom.
Windows have angular, arched, and decorative styles, plus curtain and blind options. Many windows can be resized, and that makes exterior design much easier. A plain wall can look empty until the window sizes match the room’s scale. Tall windows can make a modern build feel expensive. Smaller windows can make a cottage feel more grounded.
Stairs are flexible because they can be adjusted in width and height. They can also be placed diagonally, and the wall under the stairs can be removed for extra space or decoration. The railing options help too, because stairs look very different with both railings, 1 railing, or no railing.
Place stairs before doing major upstairs decorating. Stair position controls the entire second floor. A bad staircase can waste space on both floors at once, which is efficient in the worst possible way.
Roofs And Exteriors
Roofs in Paralives are flexible and adjustable, but the roof system is still incomplete in Early Access, so simple footprints are easier to roof cleanly than messy floor plans.
The game includes multiple roof styles, and roof pieces can be adjusted in height, width, and color through roof paint options. That gives plenty of room for different house styles, from small cottages to larger classic homes. Chimneys and fireplaces also sit in this part of the build flow and can help make an exterior look more complete.
The important roof advice is to build with the roof in mind. A floor plan with too many random bumps, tiny wall sections, and uneven corners will be harder to cover. Since the roof system is still not fully finished, clean shapes are safer. Add character with windows, porches, trim, columns, terrain, and paint instead of making the entire footprint look like it lost a fight with geometry.
Architectural details are what make the outside feel finished. Molding, columns, wall details, stains, cracks, boarded sections, graffiti, wall openings, and extra pieces can all give a building a more specific personality. Use these after the roof works, not before. Details should support the build, not hide structural confusion.
Paint, Furniture, And Style
Paint and furniture should come after the layout is finished, because Paralives lets players customize walls, floors, ceilings, roofs, objects, colors, textures, and styles in detail.
Wall paint includes different texture categories like rock, brick, plain walls, paneling, tiles, and wallpaper. Floor paint works by room or platform level instead of tile by tile, with materials like wood, tile, masonry, rock, linoleum, carpet, and other styles. Ceiling paint also exists, which is a nice touch because ceilings are often the forgotten cousin of interior design.
The best style approach is to pick 2 or 3 main materials per house. For example, a warm family home might use wood floors, simple walls, and a few tile areas. A modern home might use plain walls, large windows, and cleaner flooring. A rustic build can lean into masonry, wood, and rougher exterior detail.
Do not use every texture because it exists. Paralives gives a lot of options, and that freedom can make a house look noisy fast. A good build usually repeats materials in a controlled way. The house should look like it belongs to 1 family, not 7 different furniture catalogs arguing in public.
Terrain Tools And Landscaping
Terrain Tools in Paralives include plants, rocks, terrain sculpting, and terrain painting, making them best used after the house shape and main outdoor paths are already planned.
The plant categories include trees, shrubs, flowers, weeds, vines, rocks, and planters. Many plants and rocks can be resized, and many plants can be recolored. That gives outdoor areas a lot of style range, especially for gardens, farms, cottage builds, beach homes, and more unusual lots.
Terrain sculpting has Elevate, Lower, Smooth, and Flatten tools, along with size and intensity controls. Use Flatten first when the house needs a clean base. Use Smooth after raising or lowering terrain so the lot does not look jagged. Sculpting is powerful, but overdoing it early can make the actual home harder to place.
Terrain painting adds ground textures with depth and detail. It is best used to connect the house to the lot. Dirt paths under foot traffic, stone near patios, worn ground around garden areas, and softer terrain around plants all help the build feel less like a house pasted onto a flat square.
| Terrain Tool | Best Use | Beginner Tip |
|---|---|---|
| Flatten | Preparing the main build area. | Use before placing the main structure. |
| Elevate And Lower | Creating hills, slopes, and lot shape. | Use lightly, then smooth after. |
| Smooth | Cleaning rough terrain changes. | Use after sculpting so slopes look natural. |
| Terrain Paint | Paths, gardens, patios, and outdoor detail. | Paint after main paths are planned. |
| Plants And Rocks | Landscaping and atmosphere. | Resize and recolor carefully instead of spamming objects. |
Early Access Build Mode Limits
Paralives Build Mode is already flexible in Early Access, but builders should know that curved walls cannot currently take doors or windows, the roof system is incomplete, and fence gates are not currently available.
These limits matter because they affect how a house should be planned. Curved walls are better as decorative or exterior shape tools right now. If a room needs a door or window on every side, straight walls are safer. Roofs can still create strong houses, but simpler footprints are less likely to fight the current roof tools.
Fences are useful for gardens, patios, private outdoor spaces, and lot borders, but the lack of functional fence gates changes how enclosed spaces should be designed. Leave openings where needed instead of fully boxing off areas that Parafolks need to access.
None of these limits ruin Build Mode, but they should shape expectations. Paralives gives a lot of control, and the tools are already strong. The smartest builder uses the Early Access version for what it does well instead of trying to force unfinished pieces to behave perfectly.
Build Mode can also feel heavier on some systems once lots get detailed. If performance starts getting rough while building or decorating, the Paralives best settings guide covers stutter, lag, and crash fixes.
Common Build Mode Mistakes
The biggest Build Mode mistake in Paralives is decorating too early before the house layout, stairs, roof, and room flow are finished.
Decorating early feels fun, but it slows everything down. Once furniture is placed, changing walls becomes more annoying. Once paint is everywhere, moving rooms feels like undoing progress. Once the roof is finished, changing the shell can break the whole look. The boring order is better because it saves time.
| Mistake | Better Play |
|---|---|
| Decorating before the layout works | Finish walls, doors, stairs, and room flow first. |
| Making the house footprint too messy | Use a cleaner shell and add style with details later. |
| Using curved walls for important door and window areas | Use straight walls where doors and windows are needed. |
| Ignoring platforms | Use raised or lowered floors to make simple rooms more interesting. |
| Overusing textures and colors | Repeat a smaller material palette for a cleaner house. |
| Fully fencing areas with no access | Leave openings since fence gates are not currently available. |
| Landscaping before the house is final | Finish the structure first, then shape the terrain around it. |
The best beginner build is not the biggest house. It is the house that works cleanly. A compact home with good flow, enough bathrooms, clear stairs, and a simple roof will feel better than a giant mansion where every room is 3 miles apart and the roof looks personally offended.
Final Blurb
Paralives Build Mode is strong because it gives builders control over the shape, scale, style, and layout of a home. Adjustable walls, half walls, platforms, resizable stairs, flexible windows, paint tools, terrain sculpting, and object customization all make it possible to build houses that feel much more personal than a basic grid layout.
The best way to build is to stay disciplined. Pick the right lot, make a clean shell, build the room flow, place doors and stairs, solve the roof, then decorate and landscape once the structure works. Paralives gives enough freedom to make wild builds, but the best houses still start with boring practical choices. Tragic for chaos builders, excellent for Parafolks who enjoy finding the bathroom without needing a map.